
When your subject isn’t moving it makes things so much easier. First of all, it gives you some time to think about what you’re doing. So instead of worrying about just getting a shot, you can figure out how to make it a good one.
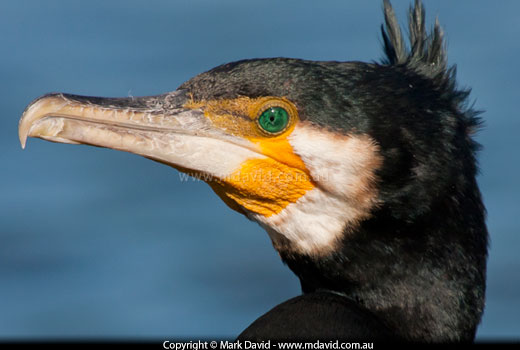
In the picture above, I’d seen a Great Cormorant sitting quietly at the edge of a lake in full sunlight. A strong breeze was making a bit of a mess of distracting waves in the lake behind it (you can see how strong the breeze was by the way those crest feathers are being ruffled) and so I wanted to blur those waves away.
You want to reduce the depth of field, to make the bird stand out and the mess going on behind it to blur away. And you control depth of field with your aperture setting. So there’s your main decision made for you: aperture priority mode.
So you select aperture priority in your mode dial — AV or A or whatever your camera calls it — and choose a small number. Because a small f-number will give you a small depth of field. In this example I opened my lens up to the smallest f-number it could manage, which was f/5.6.
If you look carefully, you can even tell that I chose a big aperture, because I wasn’t able to get the whole bird in focus. I focused on the bird’s eye, which meant that the feathers below its shoulders went a bit soft. But that didn’t worry me, because it also meant those distracting ripples were completely blurred away.
f/5.6 lets a lot of light through the lens, especially in bright sunlight, so to ensure you don’t over-expose your shot you’d expect the camera to only keep the shutter open for a very short time. And sure enough, it chose 1/2000 of a second, which is mighty fast. This had the added benefit of stopping even the slightest motion blur in that bird’s head.
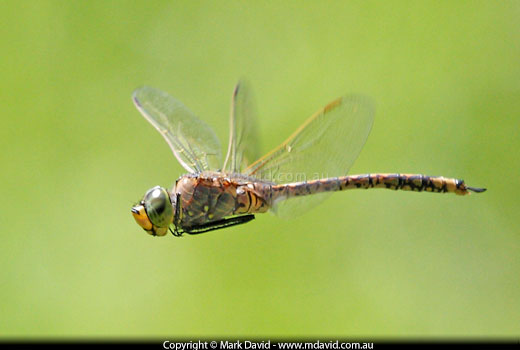
In my opinion, the best dragonfly shots show the wings, even if the insect is flying. Now, a flying dragonfly isn’t the easiest photographic subject to work with, but the same rules apply. Okay, now at this point I should also clarify something here — the dragonfly was hovering (not darting) when I took this photo. But those wings were moving more than fast enough for this exercise.
Those wings are moving crazy-fast and we want to freeze the action, so our priority in this case is to prevent motion blur.
To freeze the action you need to make extra certain you get a fast exposure. So your first setting is decided for you: Shutter speed priority on the mode dial. That might be called TV (Time Value) or it might be an S setting or maybe your camera calls it something different. Once I’d selected that, I chose 1/1250 second for this shot. The camera then took care of the aperture settings for me.
1/1,250 of a second might be fast enough to freeze the action of a dragonfly wing, but it’s not much time for your camera’s sensor to collect light. So your camera’s going to open its lens aperture up a lot to make up for it, even in bright sunlight. Big aperture (small f-number) means small depth of field, which means blurring the background away. And that was fine by me.
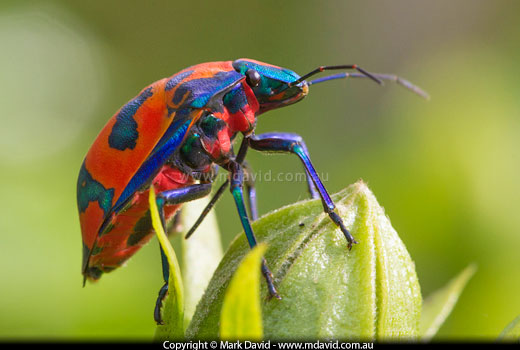
Depth of field can become paper thin when you’re photographing tiny critters. Therefore the challenge with photographing insects is getting enough of one in focus.
Depth of field. We want as much as we can get, or else that bug is going to be mostly blurred.
Aperture priority mode is your first choice for this one, because aperture is where you control depth of field. You need to pick a big f-number for a big depth of field. In this shot I went for f/10. Sure, I could have picked a bigger f-number for a bigger depth of field, but in this case it would have caused some problems. You see, the big f-numbers result in a small aperture hole and we know that to make up for that the camera reaches for a slower shutter speed. That might sound okay, but the problem with a slow shutter speed is that if you jiggle the camera even a tiny bit during that longer exposure then you will end up with camera shake blur. And macro photography is unbelievably efficient at showing camera shake blur!
So f/10 was kind of a compromise between getting enough depth of field (aperture setting) and not getting too much camera shake blur (from the slow shutter speed).
Providing the camera doesn’t want to go any slower than about 100th second then it would still probably be okay to work the camera hand-held. But if your camera is wanting to select shutter speeds like, for example, 25th second, then that’s just going to be too slow to work hand-held in the incredibly fussy field which is macro photography, which means you’re going to have to think of some other options. It might mean using a flash or a tripod. Or perhaps cranking up your ISO setting to make the camera simulate having a more light-sensitive sensor.
But hey, don’t worry if this is all a little bit too much to take in. Macro photography is a whole world of its own, and so I wrote a special 2-part introduction to macro photography explaining all this stuff and a whole lot more.
Copyright © Mark David. All rights reserved | Mark David on Google+


