
Immediately after we take a digital photo we can check our exposure by looking at the screen on the back of our camera. We can see right away, by taking a peek at our histogram, if our shot was underexposed or overexposed, and then take another shot with better settings if it looked like we got it wrong.
Back in the days when everyone used film cameras, you just had to know from experience what settings were likely to work out. Well okay, that’s not entirely true — professionals often used light meters to determine their exposure settings, or they might have used Polaroid cameras to take a test shot. But otherwise they really were basing their settings on experience plus a little bit of intuition. Besides, not everyone with a film camera had a light meter or a Polaroid camera with them all the time.

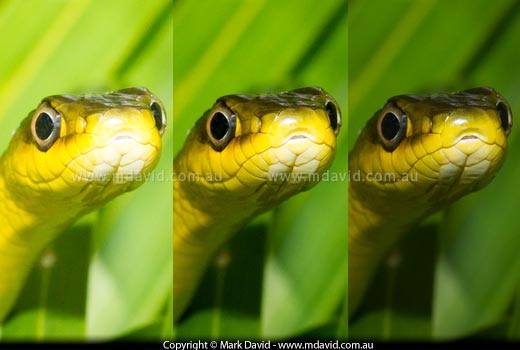
The hands and eyes were of equal importance in this shot of an Eastern Dwarf Tree Frog, so I used focus bracketing to get them all in focus. Focus bracketing is described briefly below and also in lots of detail here.
While that might have worked pretty well most of the time, sometimes even the best photographers would have a hard time figuring out the best exposure settings (a combination of aperture and shutter speed, matched with the speed of their film). So what they’d do was to take a shot at the settings they thought would be best. And then just to play it safe, they’d take another shot with reduced exposure, plus another with increased exposure. The idea was that at least one of them was bound to be right.
So that’s what bracketing is. It’s taking multiple photos of the same scene using different settings for each shot.
But then, now we’ve got these clever digital cameras that automatically look after your exposure settings, plus screens on the back to preview our shots, why does anyone bother with bracketing any more?
One answer lies in a thing called dynamic range. To save yourself reading the article I just linked to, a short definition of dynamic range is the amount of difference between the brightest and darkest parts of a scene. If the difference is too much, like for example in bright midday sunshine, the camera just won’t be able capture detail in both the shadows and highlights at the same time.
To get around that, some photographers take multiple exposures of their scenes with their digital cameras — one exposure set for capturing detail in the shadows, and another one for picking up the detail in the highlights. Then they combine the shots into one picture later using their image-editing software. Because they’re capturing such a high dynamic range, we call that high dynamic range photography, which is usually expressed as HDR photography.
You don’t have to limit bracketing to just your exposure settings.
If you can’t get enough depth of field then you can take a bunch of shots, focusing on different distances into the scene. Then you merge all the in-focus bits into one image using your image-editing software. I know that sounds complicated but it’s really not all that bad and I describe the process in detail in my article about stacking.
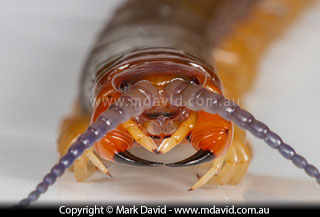
This picture of a centipede used aperture bracketing.
You can control depth of field using aperture. So sometimes you might want to get as much depth of field as possible in a shot using an extremely small aperture, but then you pay a price in image quality due to diffraction. Diffraction can create a sort of fuzziness over your entire image, which is bound to muck up any fine detail you got in the bits you were focusing on. So, to get around that you can take two shots, using different apertures: a tiny aperture to create an overall extreme depth of field, and your normal (bigger) aperture to protect the fine detail. Then you combine the best bits of each shot into the one image using your software. That’s exactly what I did to get the picture of the centipede shown above. Because the centipede is such a long critter, its body was just going to blur way too much for my liking. Aperture bracketing gave me the image I wanted.
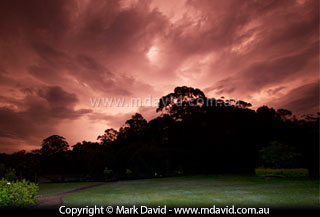
Playing some tricks in my RAW image editing software simulated the effect of colour-temperature bracketing.
You can use different colour temperature settings in multiple shots and then combine them into the one image. In fact, if you work in RAW mode then you can be a little bit sneaky and get your two photos from the one exposure, by simply exporting it with different colour temperature settings chosen in your RAW image editing software. That’s what I did in the lightning photo shown above.
Copyright © Mark David. All rights reserved


