
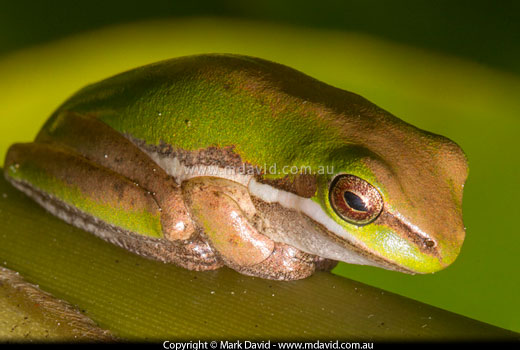
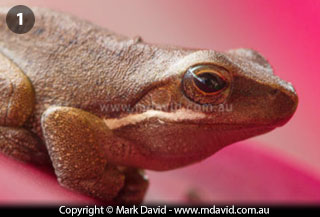
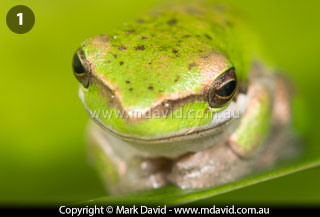
An Eastern Dwarf Tree Frog photographed using the method described below.
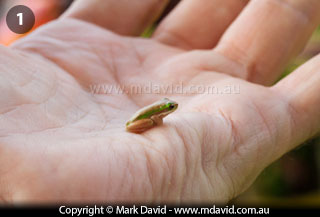
First of all, the frogs I get around my area are mostly little ones. I’m talking less than an inch long. That changes everything because it means macro photography.
I know some of you will want to get straight to my typical camera settings so here they are:
100mm macro lens, tripod, aperture priority mode set at between f/10 and f/13, ISO 400
From now on I’ll explain not only why I use those settings, but I’ll also explain my technique.
I use a 100mm macro lens. However a 180mm macro lens would probably be better because it would mean I could work further away. That would be easer for me and also less frightening for the frogs. Which means fewer of the little guys would jump away. And most importantly, I would also get cleaner backgrounds.
1: The frogs in my area are only small, and so that’s why my methods are based on macro photography. 2: A background free of clutter helps a lot if you want to draw more attention to the frog.
My hands are pretty steady, but if you’re working half upside down in wet foliage leaning on one hand and holding the camera with the other, then you’re just not going to be able to hold the camera in your hand steady enough to frame a macro shot properly. I should say, especially a macro shot. Because the tiniest change in angle of the camera makes a huge difference to the framing of a macro shot. And don’t even get me started about camera-shake blur in macro photography.
Sorry — too late. I’ve started. In macro photography, the tiniest movement will cause camera shake blur because macro, by its very nature, is the photography of tiny stuff.
So the job just screams tripod. Now I’ll stress again that this bias I have towards using the tripod in frog shots comes from the fact that I’m photographing very small frogs. If they were bigger frogs then I’d probably work the camera hand-held.
Yes, I know. There’s a notable absence of frogs in these shots but they illustrate something which I reckon is important. Picture 1 was taken with a flash and Picture 2 using nothing but natural light. Note the black (underexposed) background in the picture taken with a flash. Both of these shots were taken in the middle of the day.
You also want a tripod for other reasons. Tripods allow for slower exposures. You see, if you use a flash, then the light from the flash will be insufficient to illuminate the background and so everything more than a few inches behind the frog will end up black. Or if it’s bright enough for the background then it will be way, way too overpowering and bright for the frog. And I worry that flash is bad for frogs’ eyes and so that’s another reason why I avoid using the flash when I photograph them.
Oh yeah, and one other reason: I just think natural light looks better.
You don’t want to jiggle the camera when you press the shutter button. In macro the blur that comes from camera-jiggle is especially noticeable, especially with the slower shutter speeds.
You could use a delayed exposure to give the camera time to stop vibrating, but I prefer to just use a cable release. Cable releases let me fire the shot in an instant. Because when a frog shifts its legs and looks like it’s about to jump you seriously don’t want to be waiting several seconds for your exposure.
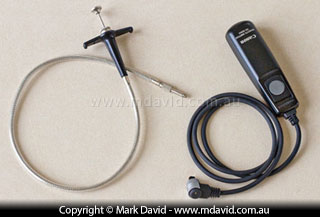
Old (left) and modern (right) versions of a cable release.
I’m a big fan of the first hour of light in the morning or the last hour before sunset. That’s when the colours of everything look their best, and dynamic range is not too awful. It’s when I go looking for frogs.
You don’t want any. The slightest breeze hitting the leaf where your frog is sitting will be like a hurricane when you’re looking through a macro lens. That will result in your frog jiggling around and filling your photo with motion blur. You’d be surprised how much even the tiniest movement can wreck a macro shot. So look for a place away from the breeze. And even then, you’ll usually need to wait until all noticeable movement in the air has stopped.
Experts agree that frog photography works better with at least one frog. I’m pretty lucky because where I live I got rid of the Cane Toads, and that allowed tree frogs numbers to explode. So I can almost always find a tree frog now, and in the peak season (summer) I can almost always find dozens.
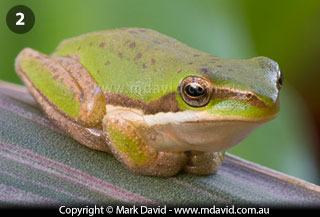
If you get your camera down to the frog’s eye level you’re almost certain to get an image that is more engaging.
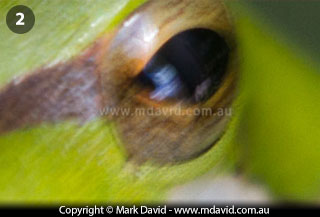
1: In macro photography, the colour of even a small part of the surroundings can have a huge impact on the image. 2: A typical example of motion blur caused by a very light breeze buffeting the leaf on which the frog was perched.
Here’s something I do in a lot of macro work. I work in slow motion. Not because I get paid by the hour but because when you work at normal speed your movements are bound to frighten away your subject. You ideally want to see the frog’s face, and one quick movement on your part will result in the frog turning around and jumping away. So you need to set up your camera and tripod really, really slowly.
1: A bigger aperture (smaller f-number) will allow the frog to blur into its background. In this case it was f/7. 2: An especially tiny frog needed a smaller aperture than usual (bigger f-number) so I could get most of it looking sharp. In this case it was f/13.
Oh yeah, and the frog’s not going to hang around while you set up a whole pile of camera gear in front of its face either. So I try to anticipate the height and configuration of the tripod and then, doing slow-motion movements, lower the whole tripod, camera and cable release into position in front of the frog. Then I fine-tune the framing and focusing using extreme slow-motion in how I reach around to the front of the camera to turn the focusing ring. One quick movement and your frog will jump away.
Because you’re working in light that’s not very strong, your camera might want to reach into some crazy high ISO settings. Don’t let it. Because crazy-high ISO means noise. I like to lock my ISO at about 400 because I know my camera is okay at that level. If the light is especially weak then I’ll go for ISO 800 rather than slow my shutter speed too much. You’ll have to figure out for yourself what ISO level your camera is good for.
In macro, depth of field is a major headache and so it’s really hard getting a whole frog in focus if that frog is tiny. You can go for a small aperture such as f/16 but then you’ll start getting a bit of loss of image quality due to diffraction. And most likely, the background will start to be a bit distracting too. So I like to work at around f/10. I like to also avoid f/16 so I can blur the background away. (I explain all about blurring backgrounds and apertures and depth of field in my beginners’ guide to digital SLR photography.)
I encourage people to use f/16 when they’re starting out in macro because it does make it easier to get an okay result from day 1, but as you get more familiar with the technique you can start fine-tuning your aperture.
Of course, you don’t have to restrict yourself to only using f/10 either. A bigger aperture (smaller f-number) will allow not only the background to blur away but will allow the frog to blur into the background too. So be as creative as you like. But remember that really big apertures will make it difficult to get even just one eye in focus due to the resulting tiny depth of field.
I might use autofocus to get the general focus setting right, and then I switch to manual focus to fine-tune it.
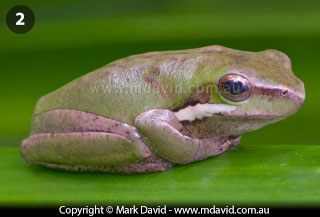
This frog (a Peron’s Tree Frog much bigger than the usual frogs I find) was on the outside of a glass door at night. My technique was pretty much the same as the other shots: tripod, aperture priority, and no flash.
In precise maco work I like to use Live View mode. That means I’m framing the shot and focusing using the little screen on the back of the camera. My camera allows me to zoom in part of the scene (I always choose one of the eyes) to check focus and for this kind of work I find it to be a real advantage. Just be aware that Live View mode is going to chew up your battery charge in no time. So if you’ve got a day of photography ahead of you, just be wary about battery life, or have a recharged battery ready.
I always like to get the eyes in focus. If you can’t get both eyes sharp then focus on the eye closest to the camera. This is where you’ll be glad you’re working with the steadiness and precision offered by the tripod.
You’re in aperture priority mode so you’re letting the camera choose your shutter speed. It will probably be slower than you would normally use if you’re working hand-held.
If you want to get more of the frog in focus than your depth of field allows, then you always have the option of taking a series of stacked shots. I’ve personally come to prefer the more natural effect you get when you allow parts of the subject to fall out of focus but it’s really up to you to decide what you like.
I’ve been taking photos of frogs for years and it is always a challenge. Each frog photo probably takes me about 20 minutes from start to finish. It’s always physically uncomfortable, and some frogs invariably turn around and jump away just before I can fire off an exposure. But getting a nice pic of a frog is worth the effort every time.
Copyright © Mark David. All rights reserved


