
Any photo can be printed any size you want, providing you don’t care how good or bad it looks. So when you ask how big a photo can print, what you’re really asking is, how big a photo can print while still looking good.
First you need to know how big the image is when measured in pixels. I’m not talking about how many megapixels. I’m talking about a number of pixels wide and a number of pixels deep. Then you need to know how many pixels per inch the file has been saved at.
You can find those numbers by opening your file in an image editor like Photoshop and selecting Image Size. Chances are that Image Size dialogue box will also tell you how big your image will print, but if you’re not sure what it all means then just enter the numbers into the boxes below and click on the button.
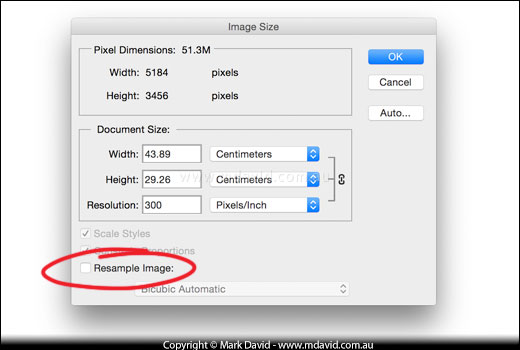
The Image Size dialogue box in Adobe Photoshop tells you a heap of handy info. For example in this case, it’s telling us that the image was 5184 px wide and 3456 px deep, and that it would print 43.89 cm wide when saved at a resolution of 300 pixels/dots per inch. Changing the number of dots per inch without otherwise mucking around with the image is as simple as unchecking the option to resample (the bit I’ve highlighted) and then entering a new number in the Resolution (Pixels/Inch) field.
Changing the number of dots (or pixels) per inch affects how big it will be when you print it. Or at least it does when you print it on your printer at home (printing your shots at a photo booth in a shopping centre will most likely ignore your dots per inch setting but even then you’ll be bound by the other constraints mentioned in this article.) That’s why you needed that dots/pixels per inch number in the calculator above. You see, when you have more pixels per inch what you’re doing is squeezing more of your photo into a smaller area. You can test that yourself by entering the same pixel dimensions but with a different number of dots per inch into the calculator above.
So for example, when you half the number of dot/pixels per inch but keep everything else the same, then you double the width and the height when you print it. Of course you can do that to your actual image files by opening them in your image editing software, going into the Image Size settings, making sure the option to resample the picture is not selected and then entering a new number of pixels per inch.
Does that mean you can keep making the dots per inch number smaller and just keep making your print jobs bigger? Well, yes you can, but you pay a price in image quality. Because if you choose too small a number of dots per inch then the printed version will start looking a bit soft and blurry as everything gets all stretched out.
But that doesn’t have to be all bad. Because if something is printed really big then you’ll probably want to stand further away to look at it, and then you don’t notice the blurriness as much any more. That’s how billboards get away with printing photos that are so huge. It’s not because they use zillions of megapixels. It’s because they use really small numbers of dots per inch, and they get away with it because you rarely see them close enough to notice the huge printing dots that are spaced so far apart.
In fact, when you think about it, an image printed at 300 dots per inch and seen at a distance of one metre, will look the same to your eyes as the same image printed at 75 dots per inch and seen from a distance of 4 metres. Because it’s 4 times less resolution while also being 4 times the distance away. The two cancel each other other.
So how can you predict how low you can go with your dots per inch setting?
The rough guide shown at right will give you some idea of what to expect at different numbers of dots per inch.
When you need to print a photo, first consider the quality of your photo paper, because only the top-quality photo-type papers can take full advantage of high numbers of dots per inch.
Then look at how many pixels wide and deep your photo is. Once you know that then you can figure out if you have enough pixels in your photo to print it at the resolution (dots per inch) you need for how good you want it to look.
If you find that the only way to get your image to print big enough for what you want is by using a dot/pixels per inch number that is too small for the quality you need, then your image file won’t be big enough for your needs. The good news though, is that most modern digital cameras give you plenty of pixels to work with, thanks to their big megapixel counts. It’s mainly the art photographers demanding the absolute best quality in large printed images, who find themselves sometimes running out of pixels.
Yep. Image editors like Photoshop allow you to increase image size by resampling a image to a bigger size — in other words, they allow you to rebuild the photo using more pixels. But that’s not going to buy you any advantages in image quality. All it’s going to do is to stretch the same amount of detail into a bigger file with more pixels, and it will look about the same printed big as if you’d never resampled it.
Copyright © Mark David. All rights reserved


