

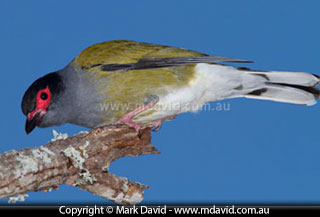
Dynamic range nightmare: despite most parts of this photo being underexposed, other areas are so overexposed that they are blown-out. The bird, by the way, is a Blue-faced Honeyeater.
Dynamic range refers to how much of a difference there is between the lightest and darkest parts of what you’re photographing. If the difference is too much, like for example blinding bright highlights alongside dark shadows, then your camera won’t be able to record detail in everything at once.
What usually happens is that you end up with a photo with blown-out areas. And by blown out, I mean bits that are so badly overexposed that they turn out pure white, with no detail recorded in them at all. Like in the magpie photo below. If an area is blown out then no computer trickery in Photoshop or your RAW software is going to be able to resurrect the lost detail.
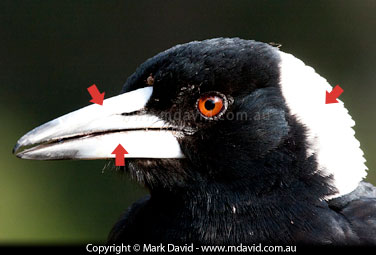
Here’s an example of problems with dynamic range. The arrows are pointing to blown-out bits in this photo of an Australian Magpie.
Photographers try to avoid blown-out bits in photos because they look bad. And thankfully, it’s easy.
Modern cameras are impressive, but not as impressive as our eyes. When you go outside on a sunny day, your eyes do a brilliant job seeing detail in the shadows and highlights at the same time. We take a photo, and are left disappointed that the camera didn’t do as well. This is one of the reasons why your photos can end up looking different to how you remembered things.
And it’s much more likely to happen if you take your photos during the brightest times of the day.
Sunlight is at its strongest in the middle of the day. And strongest means brightest. But the shadows can be just as dark as always, especially if there are no clouds around to scatter light in from the sides. That means you’re asking your camera to capture a bigger range of dark to light (a bigger dynamic range) than what it can handle.
If the light’s so bright you want to wear sunglasses, then expect to have problems with dynamic range, most probably resulting in blown-out highlights.
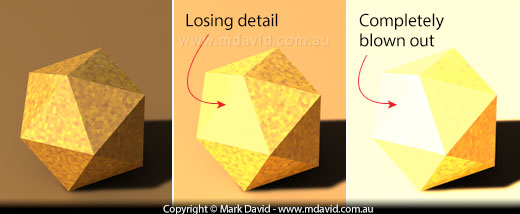
As the light gets stronger, it can become more difficult to avoid blown-out highlights.
In the graphic above I fired up my 3D software to create a simulation of this kind of thing. It might give you a better idea of what our cameras have to deal with as the light gets stronger.
By comparison, photos taken at my favourite times of the day, which is just before sunset or just after sunrise, don’t have that problem. The light isn’t as strong at those times, which means less contrasty (less dynamic range). At those times your camera will find it easier to capture detail right across the scene.
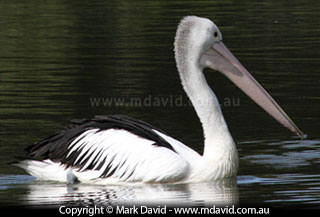
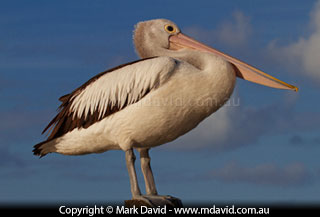
To really stress this point, I’ll compare some pictures of pelicans. The first one was taken in the middle of the day. See how contrasty it is, and how washed-out the colours are too. But the next picture was taken in the gentle light five minutes before sunset and it captured decent detail (and much nicer colour) right across all parts of the image.
If your problem is too much of a difference between light and dark, then all you have to is to make the difference smaller! Which means making the bright areas darker, or the shadow areas brighter. And there are lots of ways of doing those. From now on I’ll describe some.
This Australasian Figbird was silhouetted against a bright blue sky. All I had to do to fix that problem was to use my flash.
If the sun is coming from behind your subject, then chances are your subject is going to look black (a silhouette) against a crazy-bright background. So there’s your dynamic range problem. And the fix is to just throw some light into the shadows. That way the shadows won’t be as dark any more, bringing them closer to the level of brightness in the background. And how do you add that light? You use your flash.
If I’m using a powerful external flash in those circumstances then I usually turn its power down a bit or else the subject might end up overtaking the brightness of the background. Or if I’m using a built-in pop-up flash then I just flip it open and hope for the best. The good news is that fill flash usually works really well. This is one reason why professional photographers often use their flash in the middle of the day.
While a flash is handy, it’s not going to be much use if your subject is a long way away. Because that flash just won’t be powerful enough. Which means you’re likely to get your dynamic range problems again.
But you still have an option.
What you need to do is to make the whole photo darker by using exposure compensation. That way, any potentially blown-out bits will become dark enough to start capturing detail again. Of course, the shadows and everything else will end up going darker too, resulting in a photo which looks too dark overall. But that’s something you’ll be able to fix with your software, resulting in a more even mix of light and dark tones and no blown-out bits.
HDRI stands for High Dynamic Range Imaging. In other words, it’s the capture of scenes that have a very big difference between the lightest and darkest parts in the scene. There are some tricks you can use to do this kind of stuff. I’ll describe one of those tricks here, but to be honest I’m not a huge fan of it because it can sometimes produce pictures that look a bit bland and grey.
The trick is to take two exposures: one that’s correctly exposed for the highlights and another one exposed correctly for the shadows. Then you combine the best bits from both photos in their image editor to get a shot where nothing is too bright or too dark and everything, to quote that well-known photographer Goldilocks, is just right.
Imagine you want to take a photo of the inside of a house plus the view outside (visible through an open door) at the same time. The outside is insanely bright in full sun and the inside is gloomy and dark. That’s going to bring up some dynamic range problems.
What you do then, is to use your flash to boost the amount of light inside, so it matches how bright it is outside. That way you can get the whole lot — inside and outside — correctly exposed with just one shot.
A common problem for landscape photographers is the bright sky above a dark landscape. You could take a different exposure for each and merge them in your image editor, or you can use a graduated neutral density filter.
A graduated neutral density filter is one that’s dark at the top and clear at the bottom. The dark bit darkens that bright sky so it doesn’t look glaring and overexposed any more. And the clear bit, well that bit does nothing at all. It just lets you get the ground looking good. I suppose you could say it works like sunglasses at the top of the scene and clear glass at the bottom. Suddenly your high dynamic range problem is fixed again.
Dynamic range sounds scary and just a little bit nerdy too, but to be honest it doesn’t have to be a big deal. Understanding simple ways to reduce the amount of light-to-dark doesn’t require a degree in rocket science. Which means you can spend more time thinking about the really important stuff in photography, such as how to compose your shot.
Copyright © Mark David. All rights reserved


