
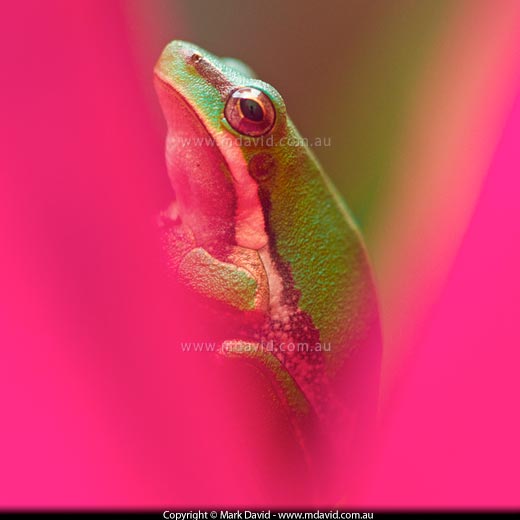
An Eastern Dwarf Tree Frog nestled into the vividly coloured plumage of a Pink Cordyline plant. This photo was taken hand-held using natural light.
Before you start reading, I want you to know you shouldn’t feel bad if you find this whole camera business heavy going. I did too when I started, which is of course why I’ve worked so hard to make this as easy to understand as possible. But some of you might find this article a bit tricky to follow too.
If that’s the case, then I’ve written a very brief primer article, purely for the folks who are just starting out. It will give you a real advantage if this stuff feels alien to you. So any time you think I’m going too fast, know that you can always jump over to that primer.
Now with that said, let’s go!
That fully-automatic setting which turns your SLR into an aim-and-shoot box is smart, but unfortunately it doesn’t get it right every time. That’s because it can’t always guess what you want. But no worries — by the end of this article you might not even be wanting to use it any more!
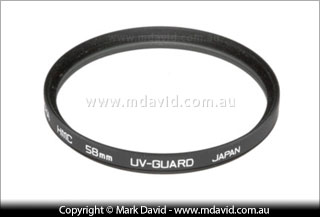
A UV filter will provide some physical protection from dirt, scratches, bumping etc for your lens. You’ll need to make sure the diameter of the filter matches your lens or else it won’t screw on. Once it’s attached you can leave it on. Your lens cap should clip right over the top of it.
Modern SLRs use a whole bunch of auto-focus points to help you take better pics. That is, when they’re not helping you take worse ones.
Here’s an example. That blurred black thing in the picture below is a wren. No, really. But the wrong parts of the image are in focus. That can happen a lot when you have all focus points activated. Which makes sense when you think about it — all those focus points are more likely to latch onto those many bits of foliage rather than that one little bit of bird.

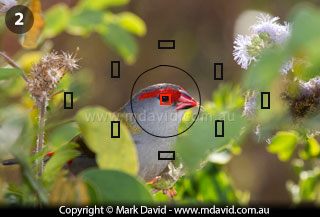
1: Having all the focus points activated meant the camera focused on the wrong part of the scene with the small black bird (Red-backed Fairy Wren). 2: I’ve activated only the centre focus point this time, and so I was able to make sure the right part of this scene came out in focus. This time the bird is a Firetail Finch.
That’s why one of the first things I do is set which focus point I’m going to use. I select it and then the camera remembers my choice until I change it again. Now, to select a focus point will probably mean you need to work in something other than fully-Auto mode. Because we’re only learning here, then aperture priority mode (AV or A, depending on your brand of camera) should do fine. You can set your aperture to f/8 for example, and then choose which focus point to use. (You might need to check your camera’s manual to find out how to select focus points.)
My most common choice is to activate only the centre focus point. That means the camera focuses on whatever’s in the middle of the frame when I press the shutter button. As you get more comfortable with things you’ll find situations where some other option is better. But the important thing is that you’re the one deciding which bits are in focus, instead of leaving that decision to the camera.
And now we get to the good stuff, the stuff at the core of SLR photography. This is where your digital SLR really shows its strengths as a fantastic tool for making images.
Why am I lumping all these things together? Because they’re all connected.
When you understand this bit then the rest of photography, especially the bits which make SLRs such fantastic cameras, will start making a lot more sense.
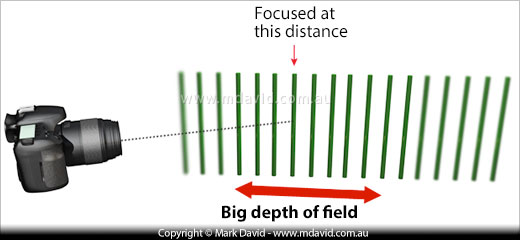
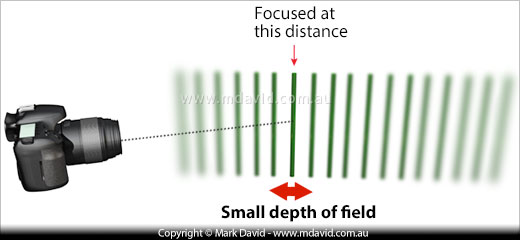
Depth of field is a term photographers use to describe the amount of distance between the closest and farthest bits that look clear and sharp. So for example, a landscape shot with everything nearby and in the distance looking like it was in focus would have a very big depth of field.


Photos of a kangaroo paw flower using big and small depths of field

In this shot of a Darter, the water was creating lots of distracting ripples in the background and I wanted those ripples to disappear. So I blurred them away with a small depth of field
Your clever SLR makes it easy to control how much depth of field you get. Some of the better compact digital cameras can too, but not as well as a digital SLR. The reason’s a bit tricky to explain but for now you can be happy knowing it involves the larger sensor used in digital SLRs.
To get a small depth of field you go to aperture priority mode (AV or A on the great big mode dial) and you choose a small f-number.
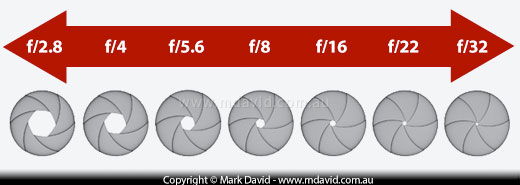
Now it’s important I go off on a bit of a tangent here so you’ll understand what I just said. A small f-number means you are opening up the hole in your lens — the hole letting the light into your camera — into a big opening. And a big f-number results in a small opening.
The smaller the f-number, the bigger the hole letting in light.
Because apertures are expressed as a fraction, and the f-number is just part of that fraction.
Huh?
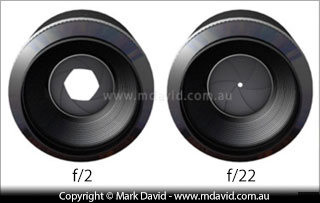
Okay, I’ll make this heaps easier to understand by talking you through an example. The “f” in aperture numbers stands for “focal length”. So for a 50mm lens at f/2 the aperture hole would measure (50/2)mm, or 25mm across.
So you can now see that f/2 means a different sized hole every time you change your focal length. For example, f/2 in a 30mm lens would give you a 15mm aperture hole.
You can hopefully see now why apertures are written as a fraction, complete with that little slash symbol. I mean, it’s not going to be very useful if someone says they used a 30mm aperture because that doesn’t mean anything until you find out what the focal length was. So we stick with describing aperture as a fraction. That way, f/2 is always f/2, no matter how long your lens is. And the f-number is just camera-speak for that fraction. And just like with other fractions you’ve seen, where for example 1/22 of something is a smaller amount than 1/2 of it, likewise an aperture of f/22 gives you a smaller aperture hole than at f/2.
Some people prefer to leave out the slash symbol when they describe their f-stops. For example, they might talk about f2 instead of f/2. But the important thing is that it means the same thing.
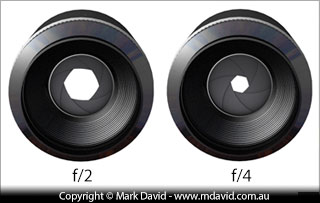
Some people think f/2 lets in twice as much light as f/4, but the truth is it lets in four times as much. The reason why is because the aperture hole at f/2 will have twice the diameter of f/4. And when you double the diameter of a circle you quadruple its area. Which means four times the amount of light!
It’s important so I’ll say it again: a small f-number will give you a small depth of field. Which means your subject is in focus but other bits can be blurred and hard to see. That kind of effect can be especially effective (and flattering) when taking portraits, and it also gives a very pleasing effect of matching the way a human eye works.
And of course, the opposite rule applies. A big f-number means a big depth of field.
Congratulations! You’ve now survived all the complicated stuff. From now on it gets heaps easier as we bring it all together.
We’ll use f/16 as our example here. You chose that big f-number because you wanted a big depth of field. Because you’re letting light into your lens through a small hole, there’s not much light reaching your camera’s sensor. It’s like being in a house with the blinds mostly closed, making everything dark (underexposed). To make up for that, your camera’s going to want to brighten the picture back up again by giving itself more time to capture photons. And it does that by slowing down the shutter speed. Which is why depth of field, aperture and shutter speed are all connected.
Have a look at the graphics below to see a rough guide to this whole thing.
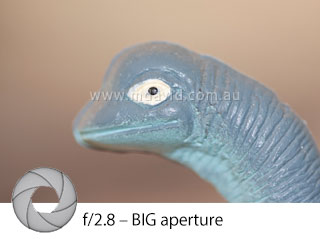
BIG APERTURE
Lets lots of light into the lens, meaning that a faster shutter speed is used.
This setup gives you LESS depth of field, for blurring your background away.

SMALL APERTURE
Lets very little light into the lens. That means you need a slower shutter
speed. You get MORE depth of field, so you notice the background.
So that’s it. Now you know it! Photography becomes a balancing act between depth of field, aperture and shutter speed, with you — the photographer — choosing which aspect to give priority to, according to what you’re photographing and how you think it will look best.
You can see in the pics of the toy dinosaur above what a big creative difference depth of field (or a lack of it) makes to a shot. I swear that the only thing I adjusted between those two photos was the aperture setting and then my SLR camera did all the rest.
So, if your main concern is providing a soft background, then you choose aperture value priority mode (AV or A mode) and select the best f-stop (aperture setting) for the amount of depth of field you want. Your camera will then take care of the exposure for you by choosing an appropriate shutter speed.
But what if that dinosaur was running? In that case you would be more concerned about motion blur in your photo. So you tell your camera to give priority to its shutter speed. That means you go to shutter speed priority mode (also called time value priority mode — it will be marked as TV, or S on the mode dial, depending on the brand of camera), then once you’re in that mode you select a shutter speed fast enough to freeze the dinosaur’s movement. Your camera will then pick an appropriate aperture to get the exposure right.
You’ve probably now guessed why your camera calls them priority modes. In shutter speed priority mode (time value priority or whatever your brand of camera calls it) your camera gives priority to your shutter speed when it figures out the exposure settings. When I say it gives priority to it, what I mean is that it uses it as a starting point in figuring out how to get the right exposure.
And likewise, in aperture priority mode the camera gives priority to the aperture (f-stop) you choose, while you give it the flexibility it needs to choose an appropriate shutter speed.
When you want to take control of both of those settings yourself then you switch to manual mode.
Because the amount of depth of field makes such an enormous difference to the appearance of a photo, a lot of photographers I know prefer to keep their camera in aperture priority mode all the time. However, with wildlife or sports photography, where your subjects are often moving quickly, then they might prefer to work in shutter speed priority mode instead to ensure their camera will always use a fast enough shutter speed to avoid motion blur.
I think it’s time to throw in one of photography’s rules because you’re ready for it now: Whenever you halve the area of your aperture hole you have to double the exposure time set by the shutter speed to make up for it. And vice versa.
Yes, of course. Isn’t there always?
Sometimes the light just isn’t bright enough for your camera to get a decent exposure, even after doing all the clever stuff I’ve been talking about.
Back in the old film days, we would have used fast film for those kinds of low-light situations. The same rules apply with digital.
By increasing your camera’s ISO setting you’ll make your camera seem like its sensor is more sensitive to light than it normally is. Which means suddenly your photos don’t come out so underexposed (dark) any more and you’re able to keep taking photos in the weak light again.
I haven’t discussed ISO until now because I figured you had enough to think about, and I won’t say too much more about it right now for the same reason. But here are a few things about ISO which are worth noting:
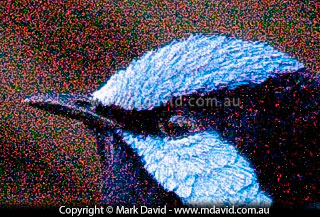
This photo of a Superb Fairy-wren has been badly degraded by noise.
All the other rules still apply, with depth of field and how it relates to aperture and shutter speed and so on, but just understand for now that higher ISO allows you to do the same things in weaker light.
To learn how to crank up your ISO you might need to glance at your camera’s manual. But I’ll stress again that you should be wary of maxing out your ISO settings, or else you could get some unusable images.
There are lots of variables in photography and I could go on and on about them. For example, a telephoto lens (one with a very long focal length) will blur your background more than a wide angle lens at the same f-stop, and if you’re interested in why that happens then I explain it here. (Don’t worry — it’s not nearly as complicated as what we’ve just learned!) But once again, the same general rules about depth of field, aperture and shutter speed will apply.
So you’ve made it through the basic concepts behind camera exposure. How you apply this is the trick behind using your SLR camera and that is surprisingly straightforward. I want you to be nice and clear about what we’ve already learned. It’s at the heart of knowing when to choose things like aperture value priority mode or time value (shutter speed) priority mode when you step outside to take your shots.
And the easiest way to make sense of it all and help you remember it, is by talking about some different situations out in the real world in Part 2 of this guide. You’ll see how we’re using this stuff to make decisions which drive your SLR camera towards much better photography.
Copyright © Mark David. All rights reserved


