
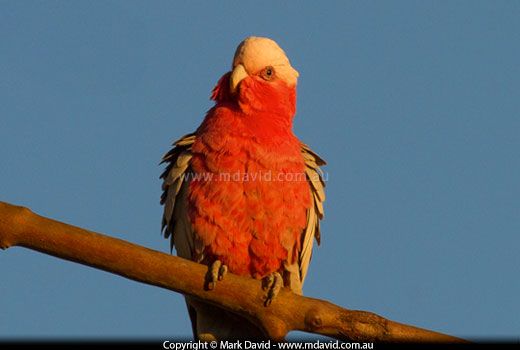
Colourful bird, rich light: The bird’s a Galah, and the light was ten minutes before sunset.
Sunlight is harsh and desaturated in the middle of the day and only gets worse when it’s overcast. Light like that will result in washed-out photos like the one of the Willie Wagtail shown below.
You might be thinking I’m exaggerating. I mean, things might have looked great to your eyes when you took the photo. But to understand what’s going on you have to pause for a moment to think about how clever your eyes and brain are.
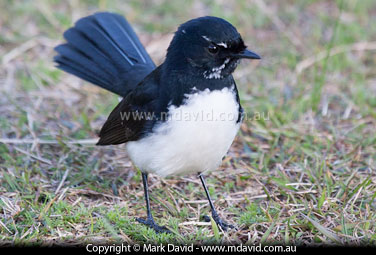
The harsh, desaturated early-afternoon light washed most of the colour out of this photo of a Willie Wagtail.
Stand in a room lit only by an old incandescent bulb, and your eyesight immediately adjusts to the yellowish lighting, to the point where you don’t even notice how yellow everything is. Your camera notices though, and if its white-balance isn’t working properly it will record everything with a yellow tinge. This same tendency for the eyes/brain to ‘adjust’ means we also often don’t notice just how desaturated the colours can be on a bright, sunny day either. But while cameras might have that auto-white-balance trick, there’s not a lot they can do about those desaturated midday colours without making things look fake. So they just record things as they are.
So the first thing you want to keep in mind is the time of day you take your shots.
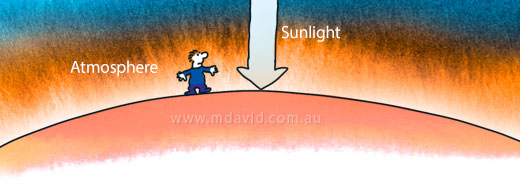
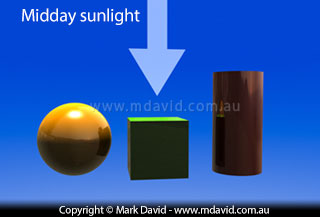
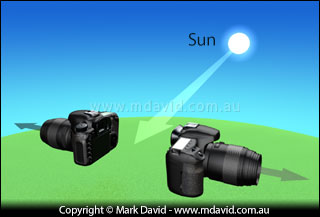
At midday, the sun’s at its highest point in the sky and therefore its light travels through the shortest possible path through the atmosphere to reach you. The diagram above shows what I mean.
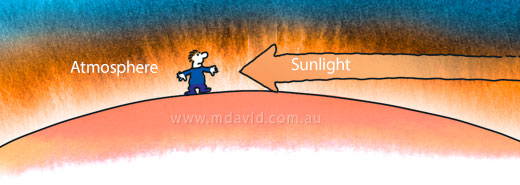
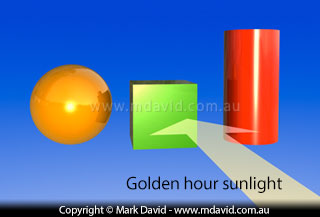
Now compare that with the first hour of sunlight in the morning or the last in the evening, which I’ve drawn in the next picture, above. At those times the light has to travel through a lot more atmosphere before it reaches you. That atmosphere has lots of tiny particles in it, and they infuse the light with the kind of warm, golden tones missing from your midday shots.
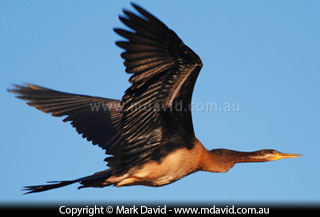
The two birds here (Silver Gull and Darter) were photographed in the same place with the same camera and even the same lens. The only difference was that the Gull was photographed at midday (you can see from the shadows that the sun was directly above it) and the Darter in the rich, golden light half an hour before sunset.
Photographers sometimes refer to the last hour of sunlight in the evening, or the first hour of sunlight in the morning, as the Golden Hour. The word ‘hour’ in Golden Hour shouldn’t be taken too literally though because the really great light might only last for a few special minutes.
Standing outside when the light’s at its most saturated in colour, a whole bunch of wonderful things happens:
At midday the light is harsh and comes straight down, hitting the top surfaces which we can’t see properly. During the Golden Hour the light is saturated with colour and floods into the surfaces we can see.
When you think about it, that combination of factors listed above is creating a kind of ‘perfect storm’ of colour. And professional photographers know it. That’s how the top landscape photographers get their eye-popping colours in their postcard shots. Their cameras are the same, or very similar, to what you have, but they’re getting up crazy-early in the morning to be at their photo shoot locations before the sun comes up, so they can be set up and ready for the best colour as the sun rises. Or they will arrive at the photo shoot late in the day to get the best light before sunset. Whether they choose sunrise or sunset will often depend on whether their subject will look better lit from the east or the west. Or like in my case, in which case it’s how much they like to sleep in.
I should point out here though that unfortunately there are no guarantees, for the simple reason that you’re dealing with that exasperating, unpredictable phenomenon which we call weather! So, cloud cover or haze can ruin everything, but then if the weather does cooperate then you’ll be in a position to capture the best kinds of colours.
If you must work in the brightest hours of the day, you’ll be grateful for a trick that cuts back on the glare and restores some welcome colour to the skies: using a polarising filter.
For a polarising filter to get the deep blue appearance in the sky, you should point the camera in a direction that’s 90 degrees from the sun.

Midday light sucked the warm tones out of this building but at least my polarising filter put some good colour into the sky. Like the other examples on this page, this image did not require any digital manipulation to achieve that colour.
Polarising filters enhance the ability to see into water (by cutting down the glare on the water surface), darken skies (while keeping the clouds white) and reduce the amount of reflected glare bouncing off surfaces like foliage. The result of all that is more colour in your photos.
When you’re using a polarising there are a few things you need to know:
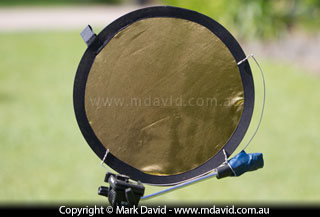
The best way I know for putting rich, warm tones into your photos is to use a gold reflector. Gold reflectors are a sheet of gold-coloured foil. You hold it so the sunlight reflects off it and into bounces onto your subject. Professional photographers use big disks of foil held by an assistant while they take their outdoor shots, but you can also get little inexpensive ones for using in things like macro photography.
That’s how I got the nice colours in the photo of the frog shown below. I used an old, cheap tripod to hold the reflector in place and then used my proper tripod to take the shot. The colours ended up just as good as the best golden-hour light but I got them in the middle of the day.
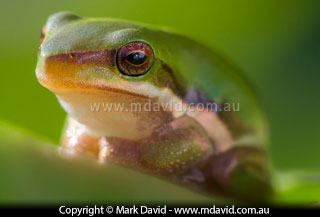
An Eastern Dwarf Tree Frog photographed in the middle of the day came out in great colour thanks to the use of a gold reflector. I used a bit of wire to attach the reflector to an old cheap tripod.
And there are other ways to get great shots possible at all hours of the day (and night). It’s just that you have to be a bit resourceful around the middle of day if you want to get good colour into your shots. For example, you can get your subject to stand next to golden-coloured walls. And of course there are always the polarising filters (mentioned above) to cut back on glare and get some nice blue into the skies.
A nearby bushfire caused the sunlight to take on a rich, orange colour, which allowed me to get good colour into this picture of a Crimson Rosella.
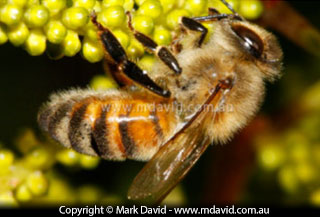
Taken in the middle of the day, this macro photo received all the saturated light it needed from the flash
And sometimes the unexpected works in your favour. When I saw the Crimson Rosella in the nearby photo there was a hazard-reduction bush fire burning a few kilometers away. The sky was therefore full of smoke, which softened the light and gave it a rich, yellow-orange tone similar to the Golden Hour. All I had to do was wait for the bird to jump out of the shadows and into a spot illuminated by that light and the colours speak for themselves.
And then there’s macro photography, where it’s likely your flash will overwhelm the surrounding light anyway. The photo of the bee shown here was taken only a few minutes before the Willie Wagtail shot at the top of this page, yet it doesn’t lack the warm tones.
As for photography other than macro, professional photographers use all sorts of tricks to restore the warm tones in the middle of the day. For example they might use large sheets of shiny gold foil to reflect warm light onto their subjects. Or they will put yellow gels over their flash for the same reason. If you look around and be a bit resourceful there is nothing stopping you from getting better colour into your shots in most situations.
We can’t always pick the times or places we work, so if you’re out in the middle of the day, you might be interested in my technique for working in harsh light.
Hey, I could fill a whole page about just this subject. So I did.
Copyright © Mark David. All rights reserved | Mark David on Google+


