
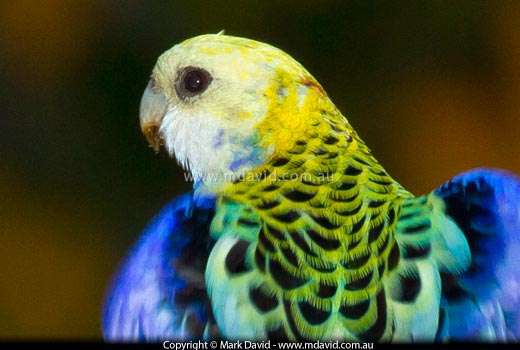
Pale-headed Rosella
Take a walk outside and most of us would be lucky to see herds of bison, mobs of roos or any from a range of megafauna. But birds are all around us. They spoil us with their variety, colour and sheer numbers. So it’s not surprising that a lot of nature photographers develop a fascination for birds. But photographing them has its challenges too.
Usually, the longer the lens the better. Birds have a frustrating habit of being small and distant so if you want to fill your frame with a small bird then that suggests telephoto. But a long lens is not your only option. You could also:
Normally, you’ll want to get the bird’s eyes in focus. That might mean you need to select a single focus point in your camera’s focus settings. Of course when I say this I’m assuming we’re talking about sitting or standing birds. If the bird is flying past then forget about the eyes and just try to focus on the bird! (More about birds in flight later in this article.)
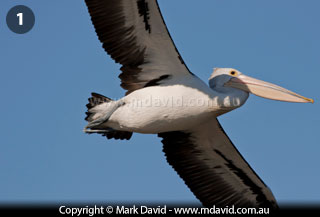
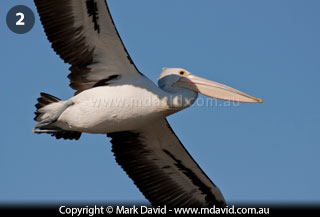
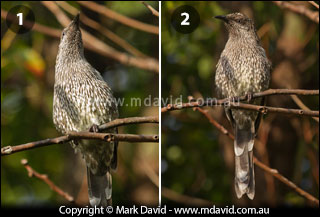
In picture 1, the pelican looks like it was hemmed in by the edge of the frame. In picture 2, the image has been cropped differently.
The way you crop can make a big difference to your photos. By cropping, I mean the use of your image-editing software to cut off the edges from the photo. If you look at the two photos of the pelican at you’ll see that the first image makes it look like the bird is about to crash into the right edge of the frame. So It’s often a good idea to allow your cropped photos to have a bit of space in front of the bird so the creature looks like it has some environment to walk/fly into, as I’ve done in the second version.
With other types of photography you will often have the time to think about these issues while framing your shot through the viewfinder, but when taking shots of birds — especially flying birds — we don’t always have that luxury!
Most of the time, birds — especially the smallish ones — get about in quick, jerky movements. A lot of birds also jerk their heads backwards and forwards really fast when they walk, resulting in lots of blurred shots. To freeze that action down to a sharp image you’re going to be forced into using a fairly quick exposure. I tend not to go any slower than 500th a second shutter speed when photographing birds. 1000th second is probably better. The exception to this rule is if you deliberately want some motion blur, like the flapping of a bird’s wings. And then 1,000th second is probably too fast. For this reason, setting your camera to shutter speed priority and choosing 1000th second is a good start. If the light is not very strong, like very early in the morning, then slow the shutter speed speed down a bit.
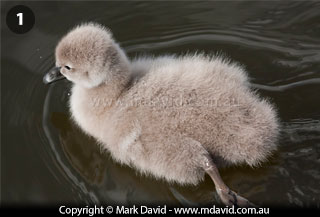
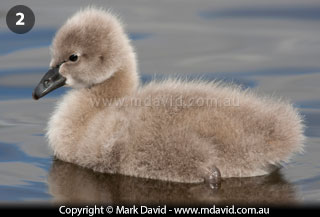
1: Because we’re so familiar with looking down on birds, a photo of a bird from that same angle can look kind of boring, yet most beginning photographers start firing off shots while standing up and end up with a camera full of pictures of the tops of birds’ heads. 2: By comparison, getting down to the bird’s eye level resulted in a much more engaging image. The bird in these shots is a Black Swan cygnet. Cute eh?
When we see birds they tend to normally be either way above us or on the ground below us. So most people are already bored with the sight of the tops or bottoms of birds. However, if you take a photo of a bird at its eye level then you have some big advantages. First, the bird will look more interesting because that’s not an angle we’re used to seeing birds. Second, you’re more likely to see the bird’s face. And third, you will find that the background of the photo, instead of being the ground directly underneath it, might switch to being something several feet away or more, which will put the background way out of focus. That will draw even more attention to the bird.
To get low enough might mean you have to lie on the ground.
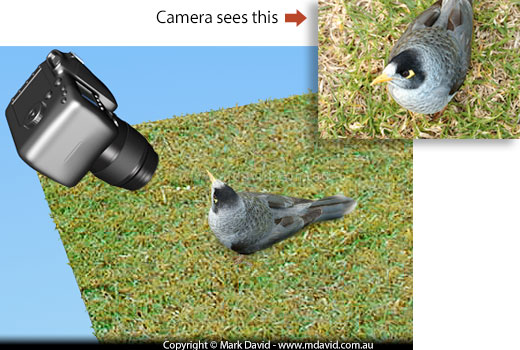
Here we go talking about camera angle again. But now I’m thinking about the background. See how the ground is going to be in focus and risk distracting from the subject?
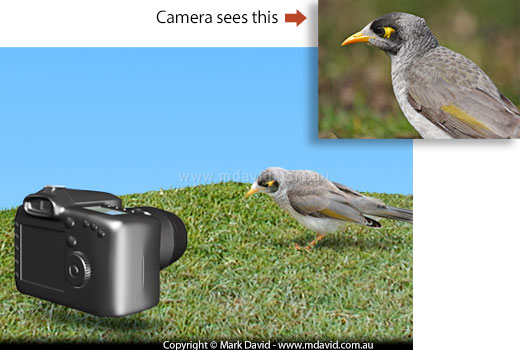
This time the background is pushed far out of focus.
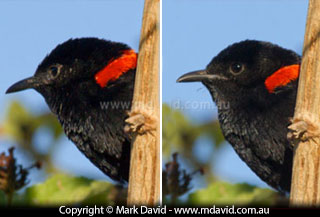
When I’m photographing a bird I usually wait until it moves its head in such a way as to get a catch light. A catch light is that little sparkle highlight in the eye caused by a light source (usually the sun). You might think I’m joking when I suggest looking for something so tiny, but the truth is that any catch light good enough for your photo will also be easily seen through a viewfinder. Usually only a slight head movement in the bird will do it. The moment you see that sparkle in the eye, take your shot. That’s what happened with this Red-backed Fairy Wren.
1: This Little Wattlebird was high above me and so I wasn’t able to see it at anywhere near eye level. 2: When that happens, wait for the bird to look down at you. They often do that, and it makes for a better shot. Both photos were taken from pretty much the same spot and so it was the bird doing all the work for me.
The bad thing about birds is that they’re always moving, so it can hard to get a decent shot of one. But the good thing about birds is that they’re always moving, so if you can’t get a decent angle of the bird, then wait patiently with your lens focused on it. Chances are the bird will give you a better shot when it moves. Birds are naturally cautious and so they will be regularly checking your position. That’s often the time to get your photo.
Just be aware though, when a bird bends down to look at you it can easily shift its eyes out of focus, especially if you’re using a very big aperture.
A good bird-in-flight photo can be a lovely thing. Not so easy to capture though. Here are a few tricks I use.
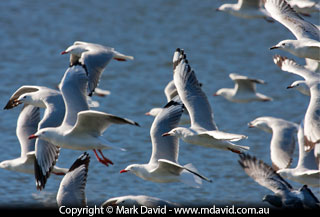
Take shots of a whole flock of birds and you’re bound to get at least one or two of them in focus. This flock of seagulls made an easy introduction to the joys of photographing birds in flight. Yeah, I know — there’s a pigeon in there too.
If you want to get bird in flight shots without too much trouble, then find a park with flocks of birds and take shots by aiming into the middle of the whole flock flying past. Pigeons, seagulls and other flocking birds are bound to produce a few nice shots and you’re likely to get a decent number into the frame too. And at least one of them should be in focus! Here are some camera settings you can try for this type of shot:
I’ve made a start here, but there’s more stuff I want to talk about with bird photography. Much more.
Copyright © Mark David. All rights reserved


